xas

Tuesday, November 27, 2012

MobileNotifier (iOS 3.1.3)

?

Would you like MobileNotifier (iOS 3.1.3) on your iDevice?
add http://cydia.myrepospace.com/PLuix/ to your Cydia Sources

How To Fix No Service issue iOS 6


THANKS TO http://absinthejailbreak.com for the solution.

How To Fix No Service issue iOS 6


How To Fix No service issue after iOS 6

Step 1: Go to Settings App
How to fix no service issue on ioS 6
Step 2: Go to General then scroll down until you find Rest
Step 3: Go to Rest and Select Rest Network Settings then your device will inform you to enter your passcode
Step 4: Your device will inform you also by the message below then select Rest Network Settings
Note: take care Rest Network Settings will let you lose cause all your WIFI passwords,
Step 5: if the error still appears so its better to restore your device here’s the link that you will use

Iphone BRIKED?? here is the FIX


Thanks to LIFEHACKER for the TUTO.

Step One: Reset

How Do I Fix My Bricked iPhone, iPad, or iPod touch?Most of the time it's as simple as resetting your device. Hold down the power button and the home button simultaneously for 5-10 seconds (it can vary depending on the state of your device). Eventually you should see the Apple logo and iDevice will boot as normal. If not, try releasing both buttons and turning on your device as normal. As a precaution, plug your device into your computer and do a full restore in iTunes.
How to Restore
If you've never restored an iDevice before it's pretty easy. Just click on its name in the lefthand column in iTunes, go to the Summary section (if it's not already selected by default), and click the Restore button. This will download the latest available version of iOS from iTunes and install it on your iPhone, iPod touch, or iPad. iTunes will know what type of device you have and download the appropriate version. When it finishes, you'll be asked to restore from a previous backup (assuming you made one—something you should be doing regularly) or set up your device as new. Assuming you have a backup, restore from it, then sync your device with iTunes when it finishes. Because a restore wipes out all data and an iTunes backup only retains settings, preferences, and other basic information, this sync can take quite awhile—especially if you have a lot of music and movies. Be prepared to let your phone sync for as long as an hour. When it's done you should be back to normal again.

Step Two: Enter DFU Mode

When resetting doesn't do the trick, you need to tell your iDevice to go into DFU mode. This method should seem familiar if you've tried to jailbreak as DFU mode is generally necessary in the jailbreaking process as it's usually used for recovery purposes. You're going to need to disconnect it from power/your computer temporarily in order to do this, so be sure to let your device charge for 10-15 minutes beforehand.
When you're ready, here's what to do:
  1. Presumably your device won't turn on or off, so let's first make sure it's off. Just like in the reset section, hold down the home and power buttons until your device shuts off.
  2. Hold down the home button.
  3. While still holding the home button, connect your iDevice to your computer. (The computer you use to sync with iTunes.)
  4. When you see a screen with a USB cable and a picture of the iTunes icon, you can let go of the home button.
  5. Restore your iDevice with iTunes using the restore instructions in the previous section.
That's one way to enter DFU mode that you can do while your device is still connected to your computer. You'll need a clock to help you count (don't count in your head!). Here are the steps:
  1. Make sure your device is off.
  2. Hold the power and home buttons for 10 seconds.
  3. Release the power button but continue holding the home button for 10 more seconds.
  4. Release the home button
  5. Restore your iDevice with iTunes using the restore instructions in the previous section.
Hopefully one of these ways should make it possible to restore your device, but if not then move on to the next step.

Step Three: Try Another Computer

When restoring your iPhone, iPod touch, or iPad fails on your computer, try another. For reasons not entirely known to us, we've been able to fix our iDevices by simply connecting them to another copy of iTunes running on a machine that's never seen these devices before. Creating new user accounts on our own computers would, in theory, work, but when we've done this it hasn't. Simply attempting to restore the devices on someone else's machine seems to do the trick when all else fails. If you're stuck, try the previously mentioned steps on a different machine. It may take care of the problem.

Unlock Jailbroken iPhone On Any Baseband


How To: Unlock iPhone 4S, iPhone 4, iPhone 3GS On ANY Baseband (iOS 5.0 To iOS 5.1) With SAM


THANKS TO IJAILBRAKE FOR THE TUTORIAL


THIS METHOD CAN EVEN WORK WITH IPHONE 4S AND 4! INTERNATIONALY.

Unlock Jailbroken iPhone On Any Baseband

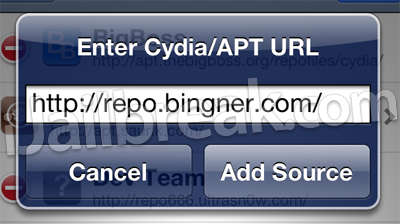
Step 1) – The first thing you will need to do is open up Cydia on your iPhone and add a 3rd party repository from the developer who created SAM. With Cydia open go into the Manage tab, followed by the Sources section, and then tap the Edit button proceeded by the Add button and type in the following URL:
Unlock iPhone With SAM
Note: Be patient when adding the repo shown above. It is currently under a lot of stress, and it took me about 10 minutes before Cydia was able to process the repo properly.
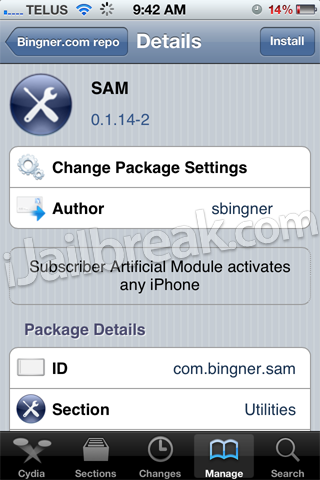
Step 2) – Once the repo shown above has been added you will need to go into the sources page by simply tapping on it from the list of installed source and then find the SAM package.
Unlock iPhone With SAM
When you see SAM you will need to install it to your iPhone.
Unlock iPhone With SAM
WARNING: Make sure the SIM card you would like to use on your unlocked iPhone is inserted before moving on.
Step 3) – With SAM installed you will now need to open the utility by tapping the SAMPrefs icon on your SpringBoard (homescreen).
Unlock iPhone With SAM
Step 4) – Go into the Utilities tab and then tap on the De-Activate iPhone option. In order to double check that your iPhone is truly de-activated return to the main settings menu and go into theMore Information tab. Look at the ActivationState label and it should display as Unactivated.
Step 5) - Now go back to the main settings pane once again, and then into the Method tab where you will need to select the By Country and Carrier option. You will then need to select the Country you are going to be using your iPhone in and then your actual Carrier. Please keep in mind that for some carriers with more than one network ID you will need to select the SIM ID option instead of selecting your carrier’s name.
Step 6) – After you have selected your carrier that you wish to use your unlocked iPhone with go into the More Information tab once again and copy the IMSI number that is present in the SAM Details section
Step 7) – With the IMSI number copied down somewhere safe you will need to click the Spoof Real SIM to SAM button.
Step 8 ) – When you have pushed the Spoof Real SIM to SAM button you will need to once again go back to the main screen, find your way to the Method tab and select the Manual option. Upon selecting the Manual option and returning to the main screen you will notice an IMSI input field. Paste the IMSI number you copied in step 6 now.
Step 9) – Grab your iPhone’s USB cable and connect it to your computer so that you can useiTunes to re-activate your iPhone. When iTunes has finished re-activating your iPhone you will need to double click the Phone Number label found in the details pane and ensure the ICCID matches that found on the SIM Card. Unfortunately if the numbers do not match you will need to restart the process from the beginning.
Unlock iPhone With SAM
Step 10) – As long as the ICCID numbers do match you will need to unplug your iPhone, go back into SAMPrefs and disable SAM by sliding the Enabled button to the off position. Finally re-connectyour iPhone to iTunes and do not be worried if any error messages pop up alerting you that your iPhone cannot be activated. Simply ignore these messages and restart iTunes a few times.
Step 11) – After a few minutes you should notice signal bars on your iPhone. This means the process has been successful and you now have an unlocked iPhone with the SIM card of your choice. One last thing to keep in mind however, is that if you notice push notifications are not working you can simply select the Clear Push option found in SAM, followed by once again re-connecting your iPhone to iTunes.
For all of those that have successfully unlocked their iPhone following this How To guide please keep in mind that this process only works with the SIM card used during the unlocking process. If you would like to use multiple SIM cards on your unlocked iPhone then you will need to repeat the process on the other SIM cards. Additionally, it is also recommended that you manually save theactivation ticket generated that allows you to use your iPhone unlocked as it could be crucial in the future to preserve your unlock.

Manually Save Activation Ticket

Step 1) – An unlock ticket will be generated after you successfully follow steps 1 – 10 outlined previously.
Step 2) – Use an SSH program to access your iPhone’s filesystem (WinSCP Windows or CyberduckMac OS X). You can of course also use something like iFile on your actual iPhone.
Step 3) – Navigate to the following directory:
/var/Root/ibrary/Lockdown
Once you are in the directory shown above you will need to copy the contents of the directory for each SIM card you unlock your iPhone with.
Congratulations! You should now have an unlocked iPhone with the SIM card of your choice, with itsactivation ticket backed up. Please leave any additional questions or thoughts in the comments section below….
Update #1: For a more detailed guide on backing up your iPhone’s unlocked activation ticket pleaseclick here.

Monday, November 26, 2012

Whatsapp For Iphone Free

Ever wanted to use Whatsapp free on your Iphone.. Well is the easy way,,,


1) Jailbrake your iDevice links available on this Blog

2) Install Whatspad from Cydia.. BigBoss Repo has it

3) Add Hackulos repo http://cydia.hackulo.us

4) Once installed search for Installous 3, 4, 5. Depends on your IOS.

5) Once Installous is Done! Open the App and search for Whatsapp

6)Download it from a working link. 

7)Add your phone number and enjoy.


Free Aplications from the AppStore with Installous


How To Install Installous 4 On 5.1 Jailbroken iPhone, iPod And iPad [Guide]

If you are an old jailbreaker user then you currently heard about Installous 4, it’s a very useful jailbreak tweak which allows Apple users to easily download any app from the App Store without needing to pay for it, yeah any app games, Musics, Books, everything you need to download from the App Store will be downloaded for free by using Installous 4.. In fact everyone love Installous 4 as it gives us everything we want so today and for those guys who are new in iOS 5.1 we will show you how to install Installous 4 on 5.1 jailbroken iPhone 4/iPad or iPod.
Today we have got for you a new little and easy guide which will show you how to easily install Installous 4 on your iPhone running on iOS 5.1…
IMPORTANT:
If you haven’t yet jailbroken your iPhone you can use Sn0wbreeze v.2.9.2 for Windows users (Tethered)guide posted here OR you can use Redsn0w 0.9.10b6 (Tethered) guide posted here Now let us began our guide..
STEP 1: Simply tap on Cydia and go to — Manage—> Sources.

STEP 2: Now tap on “Edit” button then add the following repo in order to get Installous 4 package. REPO: http://cydia.hackulo.us
STEP 3: Now and after you installed the above repo.. Simply search for Installous 4 package and install it on your jailbroken device, that’s it you are done.
But just for your info this repo consider as it’s illegal, but sometimes illegal things is good :D . Enjoy all.

Thanks to http://ijailbreaknow.com for the tuto!..

White cydia icon of DOOM FIX

Now that a viable jailbreak solution has been released for the latest version of Apple’s firmware, all is well again in the world of jailbreaking.
That is of course, unless you’re facing the dreaded white Cydia icon of doom after jailbreaking with RedSn0w.

If you’ve rebooted, re-jailbroken, and the white icon continues to haunt you in your sleep, what should you do?

Fret not; all of your options have not been exhausted; there’s one more thing you can try, and it’s easy as pie…

I’ve personally faced the white icon a few times in my jailbreaking history, and I just about tore my hair out trying to figure out how to fix it. Meanwhile the fix was sitting right under my nose.

The White Cydia Icon Fix
Step 1: Open up RedSn0w.
 Step 2: Select browse and load the same firmware you used when jailbreaking.
Step 3: Once the IPSW is successfully identified, click next.
Step 4: Uncheck “Install Cydia” and select “Just boot tethered right now” and click next.
Step 5: I recommend that you go ahead and be proactive by putting your iPhone into DFU mode prior to clicking next.
Step 6: Once you click next, the iPhone will go through the tethered boot process once. When you return to your home screen, Cydia should be back to normal.
I can’t absolutely guarantee that this will work for you, it has worked for me, and I know quite a few people who it has worked for as well,

OR
After JailBreak, click the white Cydia icon.(It will say it is rebuilding something). It will reboot itself.
After reboot you will see the white icon, click on it. It will load as usual. Now all you have to do is install something like installous and app sync etc.. Exit and check the Icon.

Has it worked for you? Let me know.


you can fin in this same blog the REDSN0W download links!!


Thanks redsn0w for the tuto!!